

Whether you’re looking to revamp your kitchen, bathroom, or even your basement, ProCore luxury vinyl flooring provides you with DIY floating floor installation capability throughout the home. With the easy-to-use Fold Down Locking Vinyl Floor System, you can avoid hiring professional installers as well as the arduous task of ripping up and disposing of old flooring!
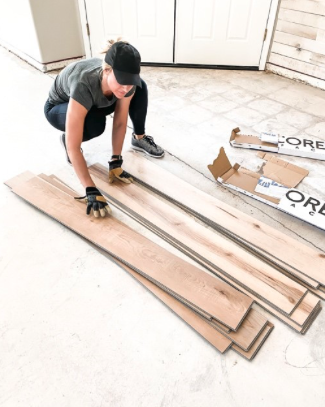
Influencer Christina Goldsmith organizes English Grove Oak vinyl planks by pattern to create a random appearance.
When you’re ready to begin your ProCore DIY flooring installation, make sure to visit our Easy Tips on How to Install DIY Vinyl Flooring blog post as well as valuable resources including technical instructions, YouTube LVT flooring installation videos, and helpful FAQs.
Once you are armed with the knowledge of how and what to do, be sure to take a moment to understand some key things NOT to do! To ensure the best results possible for your gorgeous new floor, let’s take a moment to review some common mistakes to avoid during luxury vinyl installation:
- Not Buying Enough Flooring: There’s nothing worse than starting an installation and running out of your favorite style before the floor is complete. Before you begin your project, here’s some solid advice on estimating how much new flooring you’ll need to finish your room:
First, you want to measure the room’s length and width. If your room isn’t a nice, neat square or rectangle, factor any alcoves, adjoining closets, or jut-outs by dividing the room into separate areas and measuring each one individually. Then, multiply the length by the width to get the square footage area of each sub-divided section. Add the different sections up for the total square footage of the room.
Now that you have the total area, multiply that number by 1.10 (about 10% more) to account for some waste and extra flooring for cuts. If your total area is 100 sq. ft., multiply that by 1.10 to equal 110 sq. ft. of flooring needed for installation. Since ProCore is available at Lowe’s, you can also go over your layout with a helpful Lowe’s customer service person at your closest store!
- Not Measuring an Expansion Gap: Like any luxury vinyl tile or plank, ProCore vinyl can experience expansion and contraction with normal temperature changes. Therefore, an expansion gap is required around the entire perimeter of a ProCore floor or anywhere it meets another floor or vertical surface.
When properly used, expansion gaps can relieve the pressure from heat expansion that can affect a floating floor and prevent any noticeable buckling or peaked appearance. If the floor is less than 50 ft in length or width, leave at least a ¼-inch expansion gap around the entire perimeter. If the floor is between 50–85-ft, increase the expansion gap to ½-inch around the entire perimeter. Once your floor is installed, baseboards/quarter round and other non-movable objects like cabinetry should be attached to a wall, never directly to flooring.
- Not Acclimating Your ProCore Luxury Vinyl: The prepared installation area should be fully enclosed and weather tight! For a minimum of 8 hours before installation or overnight, ProCore® luxury vinyl flooring should be acclimated to the area receiving new flooring. Store the boxes flat (not stacked) on the prepared substrate at between 65°F and 85°F (18°C – 29°C). Maintaining a controlled indoor environment will help provide the best conditions for your project. During installation, block any direct sunlight using blinds, drapes, or other protection.
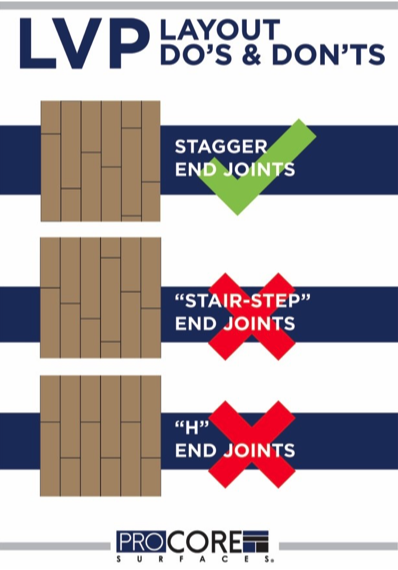
- Not Creating a Random Pattern: This is an important consideration to avoid a finished visual that you don’t like! Before beginning, check and make sure the lot numbers on the ProCore packaging match. Next, mix the planks or tiles from several boxes to ensure a random appearance. The end joint layout for all planks should be also random to ensure that joints are not “stair stepped.” If you don’t randomize your planks, the overall visual will appear stunted. If you don’t randomize the end joints, the integrity of the finished floor joint system can become compromised.
- Damaging the Locking System: It’s extremely important to carefully handle all ProCore products to avoid damaging the locking mechanism before engaging it. Do not stand boxes on end or drop them, and carefully lay them flat on the substrate.
During installation, inspect your ProCore for any damage, dirt, or debris in the locking mechanism (remove using a soft brush). Do not hit the locking mechanism directly with any hammer, tapping block, or pull bar (except the last row) as doing so will damage the locking mechanism and may result in peaking, gapping or broken joints.
- Gluing-Down A Floating Floor: ProCore floating floors are designed to be locked together to make a secure connection and freely move in the room as a whole. Floating floors should never be glued down or nailed to the subfloor! Also, permanent fixtures such as cabinets, wood stoves, and fixed appliances should never be installed directly on top of a floating vinyl floor.
- Adding an Underlayment: Since ProCore floating floor options already feature a pre-attached IXPE acoustic backing, adding another underlayment isn’t necessary; however, if you insist on adding pad, be sure to reach out to our technical team at [email protected] for a list of approved products.
- Adding An After-Market Finish: If your ProCore floor is maintained and used correctly, there’s no need to apply an after-market finish! Any finish you decide to add must be created for solid vinyl flooring, be pH neutral, and should be a matte finish. Keep in mind—once you start using a finish, this will need to become a part of your regular maintenance routine. Proper care and maintenance without using a finish is always the recommended approach.
With proper planning and consideration, your completed DIY installation will deliver the look you love, the performance you need, and you’ll avoid common DIY installation mistakes. Make sure to download the ProCore Vinyl Floor Installation Guide for your specific project and refer to ProCore Frequently Asked Questions for extra guidance, tips, and best practices.
Let’s get installing! Be sure to show off your final project using #ProCoreFloors on Instagram for the chance to be featured in our social channels!
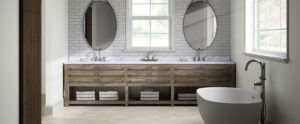
Pictured: ProCore Plus Akoya Luxury Vinyl Tile
*Important Note: These tips are meant to supplement our official instructions, not replace them. Please carefully review the technical installation instructions for your ProCore Plus and ProCore Pro products to maintain your product warranty.